
PHP SDK Integration
To integrate the PhonePe PHP SDK, you must first update the composer.json file with the specified repository details.
Install the SDK using Composer for seamless dependency management and setup.
Manual installation is possible but not recommended due to additional dependency requirements.
Client credentials like client ID, client secret, and client version are essential and can be obtained from the PhonePe business dashboard.
1. Install PhonePe SDK
To begin using the PhonePe PHP SDK, you must first add the required repository details in your project’s composer.json file.
Install the SDK using Composer for automatic dependency management and setup.
Manual installation is possible but not recommended, as it involves managing dependencies like phpdotenv and jsonmapper yourself.
You can retrieve your clientId, clientSecret, and clientVersion from the PhonePe Business Dashboard in Production.
To install the PhonePe SDK, refer to the SDK Installation.
2. Class Initialization
To interact with PhonePe APIs using the PHP SDK, you must initialize the StandardCheckoutClient class with your credentials.
This class should be instantiated only once per runtime using your clientId, clientSecret, clientVersion, and environment.
Initialization is supported in the Production environment only.
If re-initialized, a PhonePeException will be thrown to prevent multiple instances.
To set up your Client ID and Client Secret, refer to the Class Initialization.
3. Initiate Payment
To initiate a payment via the PhonePe PHP SDK, you need to build a request using StandardCheckoutPayRequestBuilder with key details like merchantOrderId, amount, and an optional redirectUrl.
Once built, the request is passed to the pay() method of the client to generate a payment session.
The response includes a redirectUrl, which you should use to route your customer to the PhonePe payment page.
This method returns a StandardCheckoutPayResponse containing order details, status, and session expiry.
To initiate payments, refer to Initiate Payment.
4. Check Order Status
You can use the getOrderStatus() method to fetch the real-time status of any order using the merchantOrderId.
You also have the option to fetch all payment attempts or just the latest one using the details flag.
The response includes the current order state, amount, transaction details, and optional error codes if the payment failed.
This helps you monitor and manage order lifecycle events directly from your server.
To create SDK order, refer to Check Order Status.
5. Initiate Refund
You can initiate refunds using the refund() method by building a refund request with merchantRefundId, originalMerchantOrderId, and amount.
Once the refund is triggered, you’ll receive a response with details like refund ID, amount, and current refund state.
To check the status of a refund, use the getRefundStatus() method by passing the merchantRefundId.
The response includes refund state, original order details, amount, and a list of refund attempts with their status and payment method used.
To initiate a refund and check its status, refer to Refund and Refund Status.
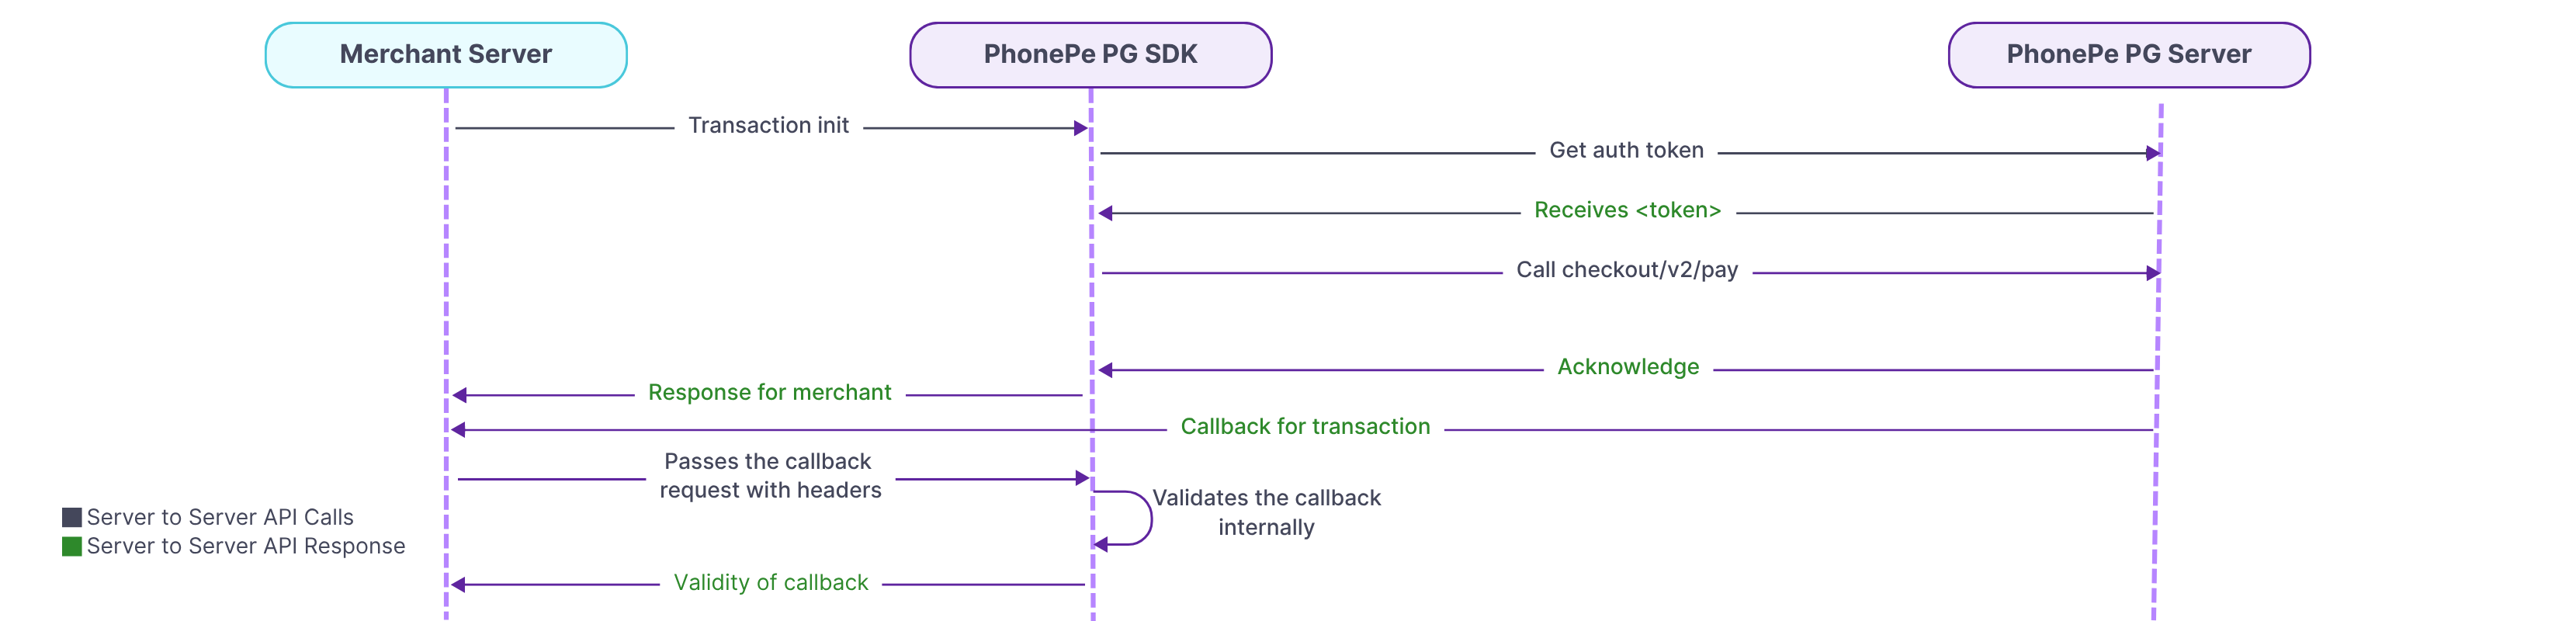
6. Webhook Handling
PhonePe sends payment and refund updates to your callbackUrl. Use the verifyCallbackResponse() function to validate these callbacks by passing the username, password, authorization header, and responseBody. If valid, it returns a CallbackResponse with details like event type, transaction status, and payment attempts. Invalid callbacks throw a PhonePeException. Always respond with HTTP 200 for successful processing.
To verify the callback refer to Webhook Handling.
7. Exception Handling
The SDK uses PhonePeException to handle errors from API calls. This exception provides useful details like the HTTP status code, error message, and additional error data in a key value format. Catch PhonePeException to handle failures and log or display appropriate error messages for debugging and recovery.
For complete details, refer to the Exception handling.
By following the above steps, you can integrate the PhonePe PHP SDK to initiate payments, check order and refund statuses, verify callbacks, and handle exceptions, ensuring a smooth and secure payment experience for your customers.
What’s Next?
You’ve now understood the key steps involved in integrating PhonePe Payment Gateway into your website. Let’s begin the actual integration with Installing the SDK.


