
Flutter SDK Setup
This section explains how to integrate the PhonePe Payment Gateway with the Flutter platform. We provide a plugin/bridge to help you integrate our SDK to your app. The implementation involves two steps:
Prerequisite
The minimum supported versions of Flutter are:
- Flutter Version: 2.17.0
- Latest Flutter SDK Version: 3.0.2
Integrate Flutter SDK
Follow the sequence below to integrate the Flutter SDK:
- Android – Add the native configuration in the Android Studio project
- iOS – Add the native configuration in the Xcode project
- Add the Plugin to your Flutter Project
- Init Method
- Start Transaction
- Server Side Implementation
1. Add the native configuration (Android/iOS)
1.1 Android
Add the native configuration in the Android Studio project
- Add the below code to ‘repositories’ section of your project level build.gradle file
allprojects {
  repositories {
    google()
    maven {
      url = uri("https://phonepe.mycloudrepo.io/public/repositories/phonepe-intentsdk-android")
    }
  }
}- Build/Sync gradle:
- Go to the android folder inside your app & sync/build gradle (by typing ./gradlew build on the command line/ terminal)
- Merchants MainActivity should extend FlutterFragmentActivity
import io.flutter.embedding.android.FlutterFragmentActivity
class MainActivity : FlutterFragmentActivity()
1.2 iOS
Add the native configuration in the Xcode project
- In your Info.plist under the iOS Xcode project, create or append a new Array type node LSApplicationQueriesSchemes to append the following values.
<key>LSApplicationQueriesSchemes</key>
<array>
   <string>ppemerchantsdkv1</string>
   <string>ppemerchantsdkv2</string>
   <string>ppemerchantsdkv3</string>
   <string>paytmmp</string>
   <string>gpay</string>
</array>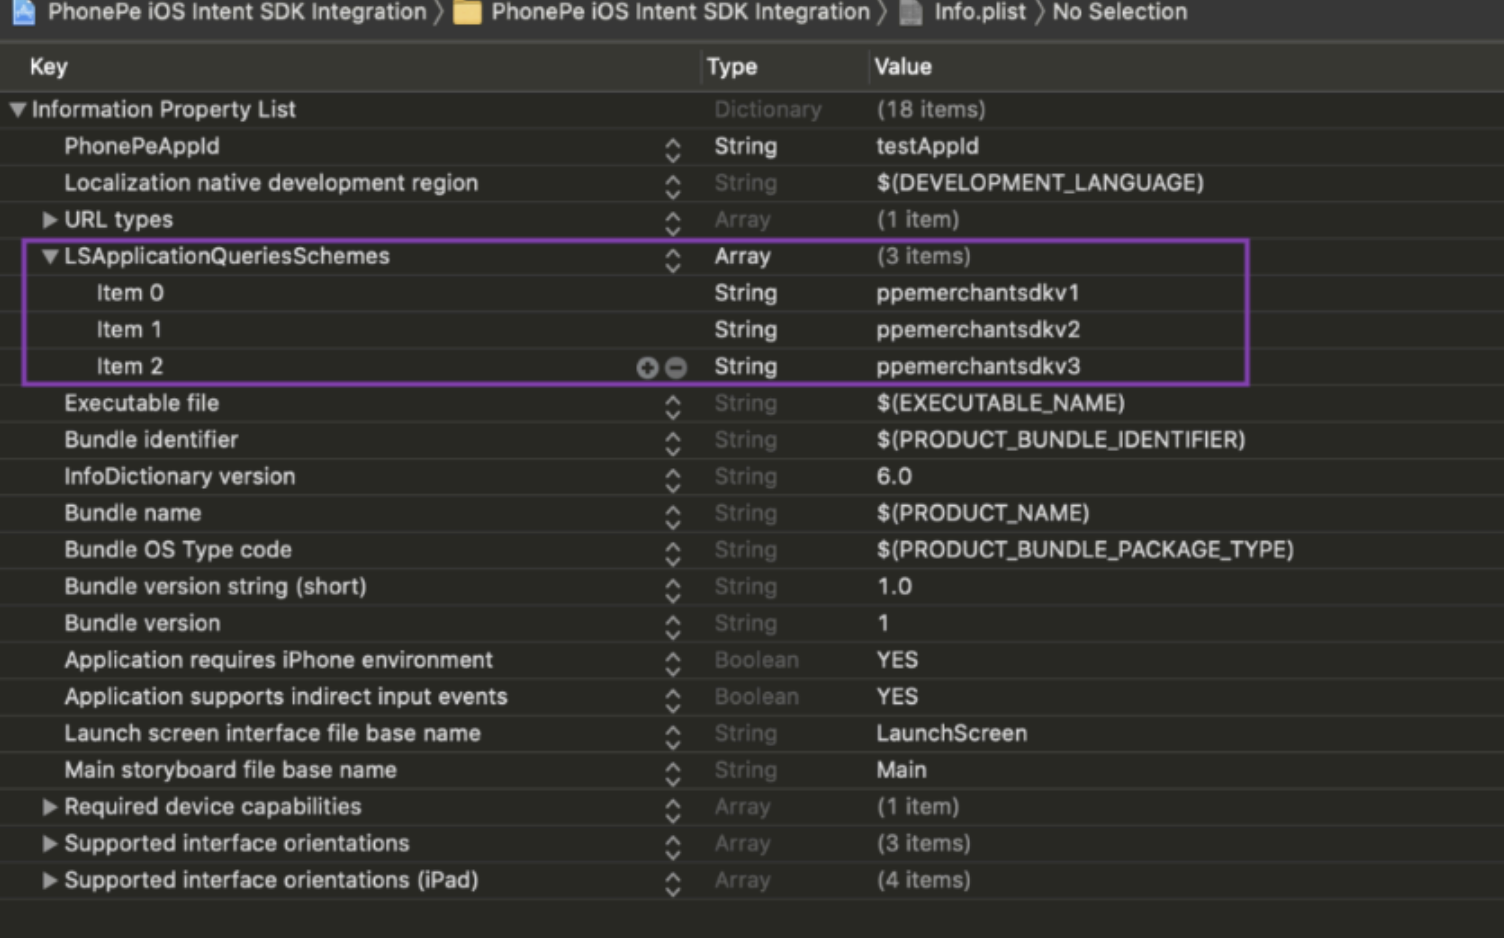
- Create a URLType for your app (Deeplink), if not already present.
- For example, we have used: iOSIntentIntegration. (You can create your own identifier for your app)

ℹ️ URLScheme Validation conditions !
- Only Alphabets (lower and upper case) and numbers are allowed.
- We can allow special characters only like dot(.) and (-)
- The name should always start with alphabets.
The schema should be correct to redirect the app otherwise it will not redirect back to the merchant app.
- For iOS dependency
cd ios
pod install- For Monitoring Transaction State and getting callback from the PhonePe consumer app, add these lines in your AppDelegate.m, inside openURL:(NSURL *) url
- (BOOL)application:(UIApplication *)app openURL:(NSURL *)url options:(NSDictionary<UIApplicationOpenURLOptionsKey,id> *)options
{
  NSMutableDictionary *userInfo = [[NSMutableDictionary alloc] init];
  [userInfo setObject:options forKey:@"options"];
  [userInfo setObject:url forKey:@"openUrl"];
  [[NSNotificationCenter defaultCenter] postNotificationName: @"ApplicationOpenURLNotification" object:nil userInfo:userInfo];
  return YES;
}
2. Add the Plugin to your Flutter Project
- Add the dependency in the Flutter project from the command line
flutter pub add phonepe_payment_sdk- Install the dependency from the command line
flutter pub get- Import the package in your dart code
import 'package:phonepe_payment_sdk/phonepe_payment_sdk.dart';- Call the PhonePe methods as below
2.1 Init Method
Initialize the init method before starting the transaction.
/*
  * This method is used to initiate PhonePe Payment sdk.
  * Provide all the information as requested by the method signature.
  * Params:
  *    - environment: This signified the environment required for the payment sdk
  *      possible values: SANDBOX, PRODUCTION
  *      if any unknown value is provided, PRODUCTION will be considered as default.
  *    - merchantId: The merchant id provided by PhonePe at the time of onboarding.
  *    - flowId : An alphanumeric string without any special character. It acts as a common ID b/w
  *      your app user journey and PhonePe SDK. This helps to debug prod issue.
  *      Recommended - Pass user-specific information or merchant user-id to track the journey.
  *    - enableLogging: If you want to enable / visualize sdk log @IOS
  *        - enable = YES
  *        - disable = NO
  */
static Future<bool> init(String environment, String merchantId,
  String flowId, bool enableLogging) async {
    bool result = await _channel.invokeMethod('init', {
      'environment': environment,
      'merchantId': merchantId,
      'flowId': flowId,
      'enableLogs': enableLogging,
    });
    return result;
  }

Example:

PhonePePaymentSdk.init(environmentValue, merchantId, flowId, enableLogs)
  .then((isInitialized) => {
    setState(() {
      result = 'PhonePe SDK Initialized - $isInitialized';
    })
  })
  .catchError((error) {
    handleError(error);
    return <dynamic > {};
  });
2.2 Start Transaction
/*
  * This method is used to initiate PhonePe Transaction Flow.
  * Provide all the information as requested by the method signature.
  * Params:
  *    - request : The request body for the transaction as per the developer docs.
  *    - appSchema: @Optional(Not need for Android) For iOS, Your custom URL Schemes, as per the developer docs.
  *
  * Return: Will be returning a dictionary / hashMap
  *  {
  *     status: String, // string value to provide the status of the transaction
  *                     // possible values: SUCCESS, FAILURE, INTERRUPTED
  *     error: String   // if any error occurs
  *  }
  */
  static Future<Map<dynamic, dynamic>?> startTransaction(String request,
    String appSchema) async {
      var dict = <String, dynamic>{'request': request, 'appSchema': appSchema};
      Map<dynamic, dynamic>? result =
        await _channel.invokeMethod('startTransaction', dict);

      return result;
    }

Example:

PhonePePaymentSdk.startTransaction(request, appSchema)
  .then((response) => {
    setState(() {
      if (response != null) {
        String status = response['status'].toString();
        String error = response['error'].toString();
        if (status == 'SUCCESS') {
          result = "Flow Completed - Status: Success!";
        } else {
          result =
            "Flow Completed - Status: $status and Error: $error";
        }
      } else {
          result = "Flow Incomplete";
      }
    })
  })
  .catchError((error) {
    handleError(error);
    return <dynamic > {};
});| Parameter Name | Data Type | Description |
environment | Enum | Possible Values: • SANDBOX • PRODUCTION |
merchantId | String | The merchant Id provided by PhonePe PG |
flowId | String | Pass the merchant user Id or the unique string (UUID().uuidString) for every init for analytics purposes |
enableLogging | Boolean | [Optional Parameter] • True (To enable the SDK logs) • False (To disable the SDK logs) Note: In Prod, make sure to set as False. |
request | String | The request for the payment initiation Note: Refer to Step 3 under Server Side Implementation |
appSchema | String | [Only for iOS]Your App URL Scheme: To return the UI control back to the merchant app. |
Server Side Implementation
- Fetch Auth Token
- Check whether the valid Auth Token is present already. If not, the Fetch Auth Token API should be called to get the valid Auth Token.
- Call the Create Order API
- Call Create Order API for Order creation with the valid Auth Token, by passing the required details. PhonePe backend will pass the Order Token in response.
- Construct the JSON request body
- Construct the JSON request body as per the payment flow and pass the JSON payload as STRING in the startTransaction method.
//Sample Request:
Map<String, dynamic> payload = {
  "orderId": orderId,
  "merchantId": merchantId,
  "token": token,
  "paymentMode": {"type": "PAY_PAGE"}
};
String request = jsonEncode(payload);
print("Payment Request: $request");| Parameter Name | Data Type | Description |
orderId | String | The PhonePe generated orderId received in the Create Order API response. |
merchantId | String | Merchant ID provided by the PhonePe Team. |
| token | String | The Order Token received in the Create Order API response. |
paymentMode.type | String | For Standard Checkout, value should be PAY_PAGE |
- Check the payment status
- Once the payment is completed, check the backend server if the Webhook has been received or not.
- If not, call the Order Status API to fetch the current payment status.
- If the status is terminal status like: COMPLETED or FAILED, the the order status can be updated accordingly.
- If incase, the status is PENDING, then call the Order Status API at regular intervals like every 15 secs or 30 secs or 1min once till the terminal status is reached.
- Once the payment is completed, check the backend server if the Webhook has been received or not.
Sample App
- Flutter Sample App – https://github.com/PhonePe/phonepe-pg-sdk-flutter
What’s Next?
You have completed setting up the Flutter SDK in your app. Next, let’s learn how to use the APIs, starting with generating the Authorization token.
Head over to the next section to learn how to Generate Authorization Token.


