
UAT Sandbox
The UAT Sandbox allows you to simulate end to end payment flows and test your integration thoroughly. It uses templates that map APIs to predefined sample responses, enabling you to simulate various scenarios such as payment Success, Failure, and Pending without real transactions.
Benefits of using the UAT Sandbox
- Even if the PhonePe UAT server is unavailable, the UAT Sandbox ensures a smooth testing experience. You can continue validating payment flows without disruptions.
- Simulate various payment outcomes such as success, failure, and pending states. This helps ensure your integration handles all real-world scenarios reliably.
- Thoroughly test the entire payment lifecycle from initiation to response. This ensures a stable and seamless experience when you move to production.
Verifying Payment Lifecycle Using the UAT Sandbox
The PhonePe UAT Sandbox offers various ways to verify the payment lifecycle across multiple payment methods. It allows you to simulate real world scenarios like success, failure, and pending statuses for comprehensive end to end testing even when the UAT server is unavailable.
Follow the steps below to efficiently simulate, validate, and debug different payment flows in a controlled testing environment.
1. Simulate Payment Flows on Standard Checkout
Follow the steps below to verify different payment methods on the Standard Checkout page using the PhonePe UAT Sandbox.
- Update the Host URL for UAT Sandbox (PG Pay and PG Check Status APIs)
- To begin testing, replace the default host URL with the UAT Sandbox endpoint in your integration environment. This helps route all payment and status check requests to the sandbox for simulation.
- UAT Host URL:
https://api-preprod.phonepe.com/apis/pgsandbox
1.1 Install and Set Up the PhonePe Test App
To validate payment flows using the PhonePe Test App:
- Android: [Download here] (Package Name:
com.phonepe.simulator) - iOS: Share your email ID with the PhonePe Integration Team on the integration thread. You will receive an invite via Firebase.
⚠️ Allow Developer Access to Proceed!
If you see “Untrusted Enterprise Developer”, follow these steps to trust the developer and continue with the installation.
Follow these steps to proceed with installation:

- Go to Settings > General > VPN & Device Management.
- Tap on the Developer App.
- Select Trust [Developer].
- Confirm by selecting Trust again.
2. Simulate UPI QR Payments
- Do not use the PhonePe Test App to scan the QR code.
- There is no need to manually set the template for success, failure, or pending scenarios.
- Instead, scan the UAT QR using any production version of the PhonePe app or other UPI apps.
- A link will appear on the screen and you can tap to open it in your browser.
- Once the link is opened, you can choose between “Success”, “Failure”, or “Pending” based on the flow you want to test. The template will be automatically applied according to your selection.

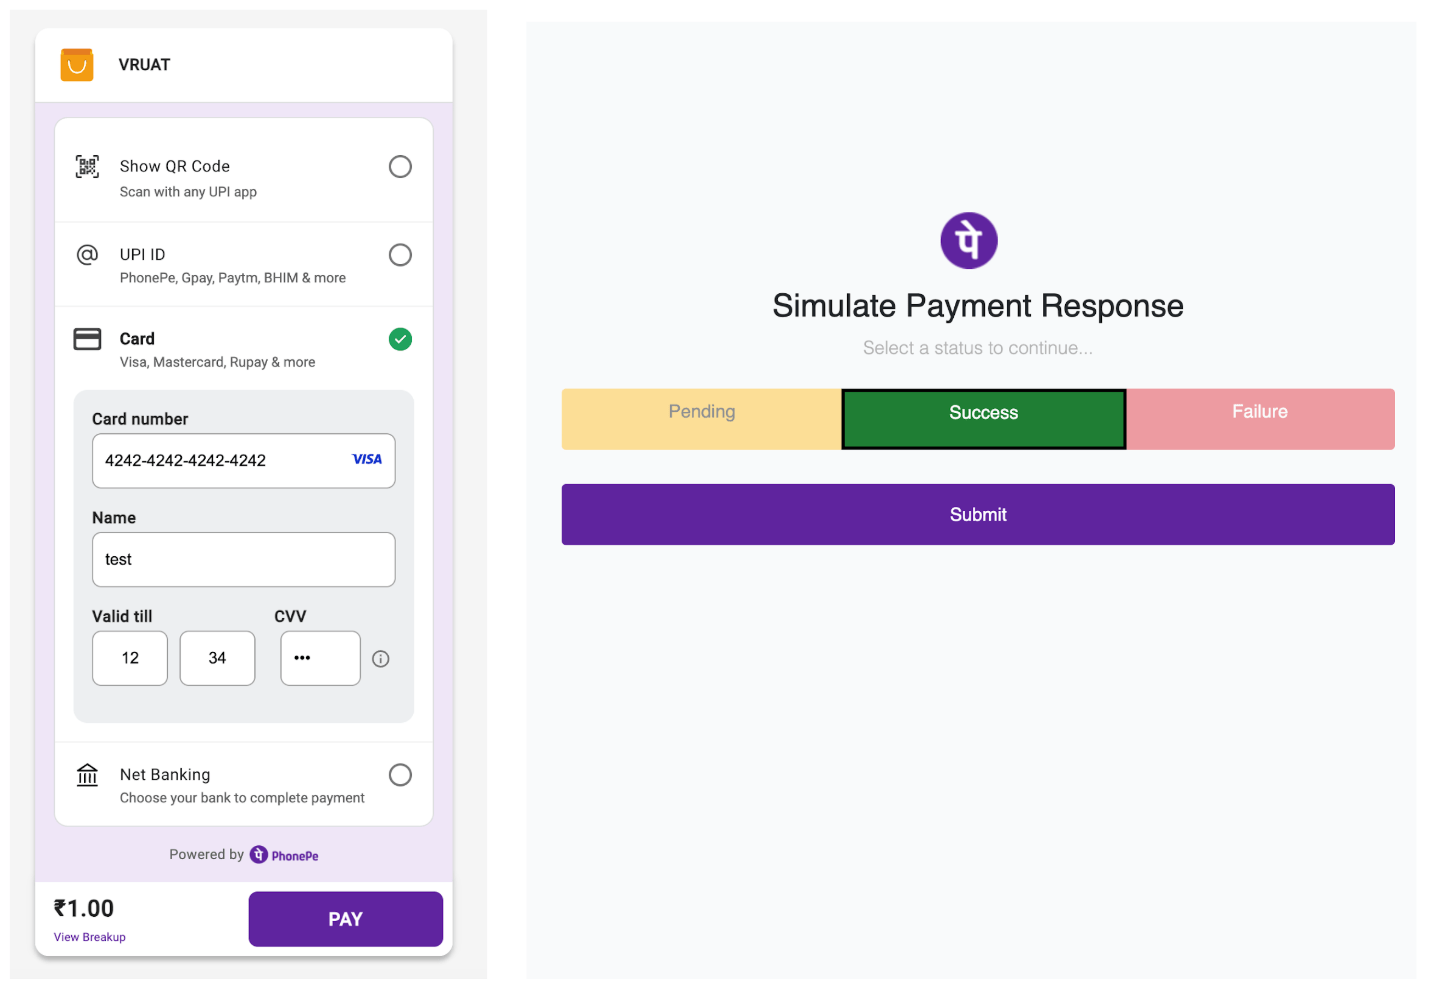
3. Simulate Card and NetBanking Transactions
- There is no need to manually set the template for success, failure, or pending scenarios.
- Instead, you will be redirected to a page where you can choose Success, Failure, or Pending based on the flow you want to test. The template will be automatically set according to your selection.
Setting Up Your Test Environment
Click on “Test Case Templates” to configure Success, Failure, or Pending scenarios specifically for the PayPage UPI Intent flow.

Configure Template for PayPage UPI Intent Flow
To set up the required template for PayPage UPI Intent flow:
- Open the PhonePe Test App and tap on Test Case Templates.
- Enter your Merchant ID and click Get Configured Templates.
- If a template is already configured, it will be displayed.
- If not, you will see No Template Configured.
- For PG Integration, select the flow: Custom and Standard Checkout V2.
- Configure the template based on your test scenario: Success, Failure, or Pending.
Steps to Configure Template
Ensure you configure the correct templates specifically for Standard Checkout integration.
- Templates related to Standard Checkout begin with the keyword: “Paypage”.
- Select the appropriate template that matches the flow you want to simulate.

Templates for PayPage UPI Intent
Use the following templates to simulate different outcomes for PG – Mobile Intent flows:
- Success: Paypage Upi Intent Success
- Failure: Paypage Upi Intent Failure
- Pending: Paypage Upi Intent Pending
Test Card Details
Use the below test cards to simulate card transactions in the UAT environment.
- Credit Card
- Card Number:
4208 5851 9011 6667 - Card Type:
CREDIT_CARD - Issuer:
VISA - Expiry:
06/2027 - CVV:
508
- Card Number:
- Debit Card
- Card Number:
4242 4242 4242 4242 - Card Type:
DEBIT_CARD - Issuer:
VISA - Expiry:
12/2027 - CVV:
936
- Card Number:
ℹ️ Simulation OTP
Use OTP 123456 on the bank page to complete the transaction simulation.
What’s Next?
Now that you have learned how to simulate the UAT sandbox environment, we will now walk you through the process of going live with your integration.


